 ×
×
How to Locally Face Swap Video with Deep Live Cam
Face swapping in videos has become increasingly popular, especially with the rise of AI-generated media. Whether you're looking to create a deepfake video for educational purposes or simply want to experiment with real-time face swap technology, Deep Live Cam offers an accessible solution.

In this guide, we'll walk you through the process of installing Deep Live Cam locally on your Windows or macOS system. By the end of this tutorial, you'll be able to swap faces in any video, whether it's a live webcam feed or a pre-recorded video, with just a few clicks.
Prerequisites for Installing Deep Live Cam
Before diving into the installation process, it's essential to ensure that your system meets the necessary requirements. These prerequisites will help you set up Deep Live Cam smoothly and avoid any potential issues during the installation and setup process.
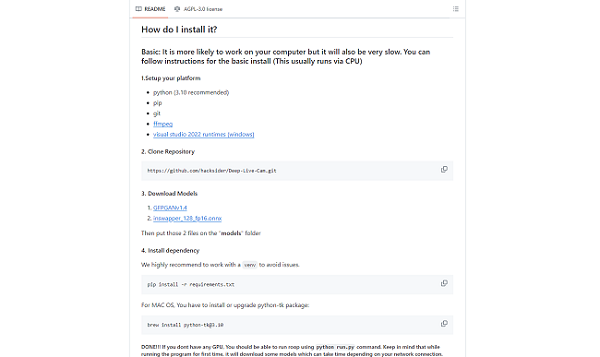
System Requirements
Before you begin, ensure your system meets the following requirements:
- Operating System: Windows or macOS
- Python: Version 3.10
- Git: Latest version
- FFMpeg: Installed for handling multimedia
- Visual Studio 2022 Runtime: Required for C++ build tools
- CUDA Toolkit (Optional): For GPU acceleration, recommended for faster processing
Step 1: Install the Necessary Software
To get started with Deep Live Cam, you'll need to install several key software packages. These tools will be the foundation of your setup, allowing you to run the application efficiently on your local machine.
Install Chocolatey on Windows
To simplify the installation process, use Chocolatey, a package manager for Windows:
1. Open PowerShell as an administrator.
2. Run the following command to install Chocolatey:
Set-ExecutionPolicy Bypass -Scope Process -Force;
[System.Net.ServicePointManager]::SecurityProtocol =
[System.Net.ServicePointManager]::SecurityProtocol -bor 3072;
iex ((New-Object System.Net.WebClient).DownloadString('https://chocolatey.org/install.ps1'))
3. Verify the installation by typing `choco -v` in PowerShell.
Install Python, Git, and FFMpeg
After installing Chocolatey, proceed with installing Python, Git, and FFMpeg:
1. Install Python 3.10:
choco install python --version=3.10
2. Install Git:
choco install git
3. Install FFMpeg:
choco install ffmpeg
Step 2: Clone the Deep Live Cam Repository
Once you have the necessary software installed, the next step is to download the Deep Live Cam codebase. This involves cloning the repository from GitHub, which will provide you with all the files needed to run the application locally.
Clone the Repository
1. Clone the Deep Live Cam repository from GitHub:
git clone https://github.com/hacksider/Deep-Live-Cam.git
2. Navigate to the cloned directory in your command line interface.
Step 3: Download the Required Models
To effectively swap faces in videos, Deep Live Cam relies on specific models that enhance its functionality. You'll need to download these models and place them in the appropriate directory for the application to use.
Download Models from Hugging Face
Download the required models from Hugging Face and place them in the `models` directory:
1. Download `gfpGan v1.4` and `ins-swapper` models from Hugging Face.
2. Save these models in the `models` directory within your Deep Live Cam repository.
Step 4: Install Python Requirements
With the repository and models in place, it's time to install the Python dependencies. These packages will ensure that Deep Live Cam runs smoothly by providing the necessary libraries and tools.
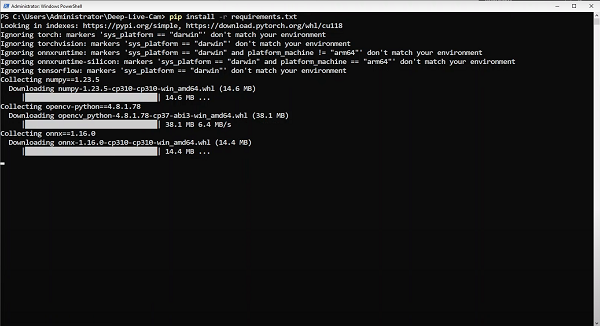
Install Dependencies
Install the necessary Python dependencies:
1. Navigate to the root of the Deep Live Cam repository.
2. Run the following command:
pip install -r requirements.txt
Step 5: Run Deep Live Cam
Now that everything is set up, you're ready to run Deep Live Cam. Depending on your system's hardware, you can choose to run it using either your CPU or GPU for faster performance.
Run with CPU
If you are using a CPU, run the application with the following command:
python run.py
Run with GPU Acceleration
For faster processing using a GPU:
1. Ensure the CUDA Toolkit is installed.
2. Run the following command:
python run.py --execution_provider cuda
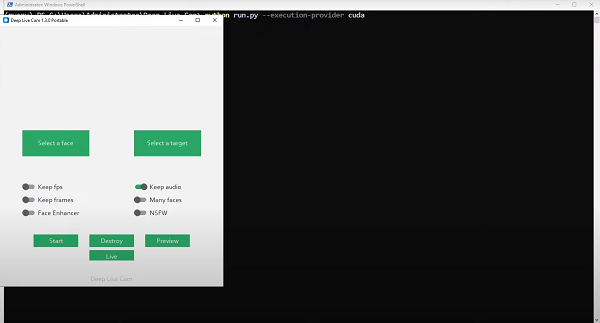
Step 6: Swap Faces in Videos
With Deep Live Cam up and running, you can now start swapping faces in your videos. This step will guide you through selecting your source and target files and processing the video to see the results.
Select the Source and Target
1. Open Deep Live Cam.
2. Select the image you want to use as the face source.
3. Choose a target video or opt for a live webcam feed.
Process and Saving the Video
1. Click on "Start" to begin the face-swapping process.
2. Choose the destination to save your output video.
3. Wait for the process to complete, then view your face-swapped video.
Conclusion
With Deep Live Cam, creating a face swap video is straightforward and accessible. Whether you're experimenting for fun or working on a project, this guide provides all the steps necessary to get started.
Remember to use this technology responsibly and ethically, especially given its potential for misuse in creating deepfake videos. Enjoy exploring the world of AI-generated media with Deep Live Cam!